Applying a brightness mask in Photoshop
Creating a nice selection without visible seams in Adobe Photoshop can be a slow and difficult process. However, the program has many tools dedicated to creating selections that make this task better, faster and easier.
In this simple tutorial, I'll show you one of the easiest and most useful ways to create a selection based on the brightness values of the pixels in an image. This method makes it very easy to edit highlights, shadows and midtones.
This highlighting technique allows for professional photo retouching, which would be extremely difficult using other techniques. This technique also creates edges on the selections that appear to have no visible seams. And all this without even touching a single selection tool!
Translator's note: Luminance mask is a technique that allows you to select pixels depending on the brightness values of the image. You can highlight highlights, shadows, and midtones using channels, then edit and retouch your photo. You can also control the brightness of highlights and shadows using a brightness mask.
1. Create selections
The selection technique that is presented in this lesson works on any image, the only thing is that to complete this lesson and further retouching, you will need to download the original image from the link at the beginning of this lesson.
Step 1
The first selection involves highlighting the bright pixels in the image. Creating this selection is fundamental to this technique because... other secretions are repelled from it.
Translator's note: the author creates multiple selections, saving each selection as a new channel.
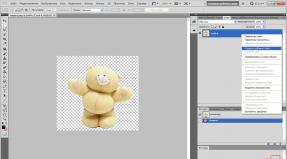
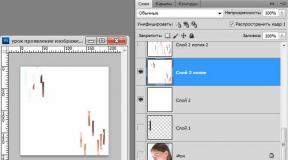
The important thing is that this is not in the menu or in the tools. It's almost like a secret handshake in Photoshop. To convert a mask channel into a selection path, use the hotkey (Alt+Control+2). Before CS5, the keyboard shortcut was (Alt+Control+ ~) (yes, that's a tilde!) But the easiest way to create a selection is to go to the bookmark Channels(Channels) and hold down the (Ctrl) key + click on the composite RGB channel. This way we will create a selection around the bright pixels or highlights in the image.

Step 2
Click the button Saves the selected area in a new channel(Save Selection as Channel) in the bottom toolbar of the palette Channels(Channels). This way we will create a new channel which will automatically be called Alpha 1(Alpha 1). Rename this channel to Light glare(Highlights).

Step 3
Next, we will intersect the selection. To do this, go to the channel Light glare(Highlights) and, holding down the keys (Ctrl+Alt+Shift) + click on the channel thumbnail Light glare(Highlights). After intersecting the selection, we will select a subgroup of bright pixels. Save the selection as a new channel, name it Bright light glare(Bright Highlights).
Translator's note: Using the intersection of the selection, the author created a new channel, selecting brighter pixels, i.e. Using intersection, the author cuts off less bright pixels while preserving brighter pixels. Thus, the author created two channels with light highlights with different degrees of brightness. Next, the author will repeat Step 3 and create a third channel with the brightest pixels.

Step 4
Next, we will draw the intersection of the selection Bright light glare(Bright Highlights), (same thing, press (Ctrl+Alt+Shift) + click on the channel thumbnail). Save the selection as a new channel, name it The brightest highlights(Brightest Highlights).

So we've created three different channels with three different brightness levels that we'll be working with. You could continue to create new channels using the intersection of the selection, but I don't see the need for this, three channels will be enough. Now it's time to turn your attention to the shadows.
Step 5
Create a new selection with Light glare(Highlights), to do this, hold down the (Ctrl) key + click on this channel ( translator's note: via channel Light glare(Highlights)). Next, let's go Selection - Inversion(Select > Inverse) (Shift+Ctrl+I)—we will invert the selected areas. This means that instead of highlighting the highlights, we will highlight the shadows. Save the selection as a new channel, name it Shadows(Shadows).

Step 6
Using the same intersecting selection technique, create two more dark tone channels. Name these channels Dark Shadows(Darker Shadows) and The darkest shadows(Darkest Shadows) respectively.

Step 7
So, we have three channels with highlights and three channels with shadows, what's left? Mid tones, of course! First select the entire image, let's go Selection - All(Select > All) or press the keys (Ctrl+A), then we will subtract the highlights from the active selection, to do this, hold down the keys (Ctrl+Alt)+click on the channel Light glare(Highlights). Next, we'll subtract the shadows from the active selection using the same technique. (translator's note: but this time click on the channel Shadows(Shadows)).
At this point, Photoshop may give you a warning about invisible selection edges because No more pixels selected than 50%(no pixels are more than 50% selected). This means that the selection will be active and that there will be no dotted lines around the selected areas.

Save the selection as a new channel, name it Midtones(Midtones). There is no need to cross this channel, because it creates an empty selection.

Once you've finished working with the channels, always switch to the composite RGB channel before going to the tab Layers(Layers). The above technique applies to any photograph, regardless of what is shown in it. You can write down Action(Action) to recreate the channel experience, especially if you spend a lot of time editing and processing photos.
2. Use Selection
Now we have selected bright pixels that are neatly saved in the palette Channels(Channels). So how can they benefit you? Why did we go to so much trouble creating them? Because they will allow us to make targeted corrections, although this would be difficult, or almost impossible, if we used other selection methods.
Step 1
Hold down (Ctrl)+click on the channel Light glare(Highlights) to create a selection. Next, we return back to the palette Layers(Layers), and add an adjustment layer Curves(Curves) for this we go Layer - New Adjustment Layer - Curves(Layer > New Adjustment Layer > Curves). Photoshop automatically uses the selection as a mask on the adjustment layer. So, drag the midpoint of the curve up, which will brighten just the highlights in the image while preserving the midtones and shadows.

Step 2
Load a shadow selection by holding (Ctrl)+click on the channel Shadows(Shadows), then add a new adjustment layer Curves(Curves). But this time, drag the middle point of the curve down a little, depending on the shadows.

Step 3
Midtone highlighting can be used to create a beautiful and subtle lighting effect without worrying about affecting highlights and shadows. Load a midtone selection by holding (Ctrl)+clicking on a channel Midtones(Midtones), add an adjustment layer Hue/Saturation(Hue/Saturation). Check the box Toning(Colorize), set the color settings to your liking. The settings I used are below.
- Color tone Hue: 33
- Saturation(Saturation): 46
- Brightness(Lightness): +8

Just as an illustration, try holding down Shift+clicking on a layer mask to temporarily disable the mask. Do you see how rich the toning effect is without a mask? Phew, how scary! Now imagine how much time it would take to paint in the highlights and shadows by hand! This example shows how useful this technique is. Don't forget to turn the mask back on by holding (Shift)+clicking on the mask.

Step 4
Create a new layer (Ctrl+Shift+N) on top of all layers, name this layer Lightening Highlights(Highlights Dodge). Next, let's go Editing - Fill(Edit > Fill) and in the menu Content(Contents), select an option Gray 50%(50% Gray), click OK. Change the blending mode for this layer to Overlap(Overlay) to hide gray tones. Select a tool Clarifier(Dodge Tool), install Range(Range) on Midtones(Midtones), and the meaning Exhibitions(Exposure) by 9%. Now, carefully paint over the areas with highlights to enhance them.

Step 5
Load selection Light glare(Highlights), and then use the selection as a layer mask to apply the lightening only to the highlights. Next, go to the palette Properties(Properties) to reduce Density(Density) masks up to 60% to slightly mitigate this limitation.
Translator's note: 1. Load a highlight selection through the appropriate channel and then add a layer mask to the gray fill layer 2. This technique, which is described in Steps 4-5-6, is designed to create lighting effects using the Dodge and Burn tools using the Luminance mask 3. New panel Properties(Properties) appeared in Photoshop CS6.

Step 6
Use the same technique to create a darkened shadow layer. Just this time, use the tool Dimmer(Burn tool) to enhance the shadow areas. Use selection Shadows(Shadow) to create a layer mask.

Step 7
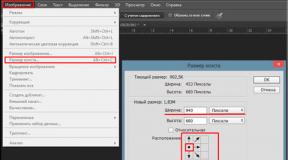
Now, create a merged layer on top of all layers (Ctrl+Alt+Shift+E). Next, let's go Filter - Sharpness - Smart Sharpening(Filter > Sharpen > Smart Sharpen), apply adjustments to add a little sharpness. The settings I used for this image are below:
- Effect(Amount): 207%
- Radius(Radius): 0.9 px
- Reduce noise(Reduce Noise): 7%

Step 8
Download selections Bright light glare(Brighter Highlights) and use the selection as a layer mask on the merged sharpening layer. This will limit the sharpening effect to only the brightest highlight pixels. Reduce this limitation slightly by decreasing Densities(Density) masks up to 81%.

And we completed the lesson!
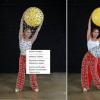
You can see the final result in the screenshot below. We created editable contrast in highlights, shadows, and midtones, adjusted the color of the lighting without making it unpleasant, added stylish dodging and burning effects, and applied a sharpening effect only to the areas we needed. All this without using even one selection tool! This is the amazing power of the Luminosity Mask!