CONVERTING A BLACK AND WHITE PHOTO TO COLOR (5 lessons)
HOW TO MAKE A BLACK AND WHITE PHOTO COLOR IN PHOTOSHOP
Today we will learn how to turn a non-color photograph into a color one. I’ll make a reservation right away for those who are looking for the “make a photo in color” button in this article. Alas, such a button has not yet been invented. You can desaturate a photo with one click, but you won’t be able to color it with the same click, because a black and white photo does not have color information. So we’ll have to work with our hands and fill our black and white image with color information in the most literal sense. Some plugins for Photoshop do a good job of colorizing photos, but we won’t discuss any plugins that we don’t know where to get from. Let's talk about what is available for colorization in Photoshop itself. And there is a lot in it.
The method of coloring a photograph is simple and primitive. A five-year-old child can master it in 10 minutes. I will tell you about all the ways to colorize a photo, and also show how this simple operation can be taken to a new, more professional level. So let's get started.
THE EASIEST WAY TO MAKE A PHOTO Blend Color
To colorize a photo you will need to know how to use the tool. Brush Tool, as well as have an idea of how other Photoshop tools work. The ability to select areas of a photo and basic knowledge about layers and masks, which you can glean from my article Masks in Photoshop, will not hurt. In this lesson, you will see in practice how you can automate work in Photoshop using masks, and have full control over color settings.

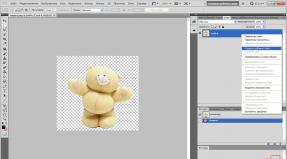
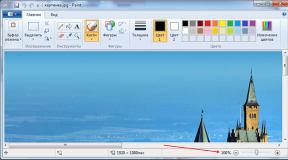
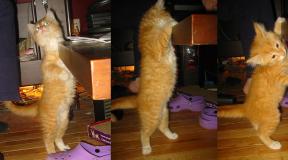
I borrowed a photo from the collection of a photographer friend of mine. Black and white photographs look mysterious and conceptual, but what happens if we color it a little? Create a new layer on top of the photo Layer > New > Layer or click on the small layer icon in the layers palette Windows > Layers

Now select a tool Brush Tool, a soft-edged brush, make it larger and drag the mouse over the new layer with some red color. The natural result is a red smear on a skillfully taken photograph. This doesn't suit us. In order for the red color to color, you need to change the settings of the layer itself. These settings are called overlay settings Color Mode. You can find them only in the layers palette Layers, above the layers themselves. Click on this drop-down menu, you will see a whole list of different blend modes. The point is that by changing the color blending mode, we establish new rules by which the layer's color interacts with the colors of the layers below. The blending mode we need is called Color, and its meaning is simple - it colors the image in the color we need, while maintaining the naturalness of the colors. Install let's decide Color, choose the color you need and color the girl’s hair.

That's all. Quite simple isn't it? Spare me the trouble of stretching out this process over 10 pages and demonstrating how I paint the skin, gloves, eyes, and so on, step by step. The coloring depends on your imagination, and the realism depends on the quality of work and the naturalness of the selected colors. Work with the brush, select the size, adjust the opacity and fill parameters, which you will find in the brush settings menu Windows > Options
This is the “mask” my wife sketched for a few minutes of work. Note that the layer blending mode is Normal. I hope you are convinced that making a color photo in Photoshop is very simple.

And this is what happens if you change the layer blending settings to Color.

COLORING A PHOTO VIA LAYER STYLES
Now let's start going deeper and complicating the process. Complication is not meant to make the work more difficult, but to make the work easier. You know, all these kali malis on one layer are of course wonderful, but they are more suitable for creative individuals, those who like to sit and spin a clay pot on a gurney for hours. Spreading one color and another on this layer is perhaps convenient for artists from the academy who were banned from Google, which is why they still have not heard about Photoshop. Alas, even cartoons are drawn on a computer; 1000 drawings on paper, which are then quickly flipped through, remain in the 20th century. Personally, as a designer, I would like to have more control over color and settings. I would like to effectively and quickly tweak colors through the menu, rather than redraw the layer.
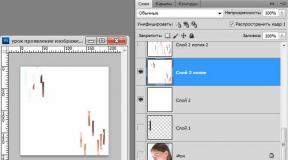
How could we bring more control over the image? To begin with, it would be nice to divide one layer into several layers. Let's create
There really are a lot of layers. And each layer will be responsible for its own area. Create a layer "hair", layer "eyes", "gloves", "nails" and others. I started coloring the photo myself, creating thematic layers for this. Now the control process is more manageable, at least the coloring is not on one layer. Any part of the coloring can be muted, turned off, in other words, you can do with it everything that can be done with a layer. Other layers with coloring will remain untouched.

But none of this still makes much sense. The color of all layers is still arbitrary. On layer "Hair" You can still draw with both blue and red. In other words, still Kali Mali, but more manageable Kali Mali, divided into sectors. But I would like to control the color as well. I want to change the entire color with one click, and not sculpt with a brush and constantly redo the result with my hands. I'll show you how to do this using layer styles. layer style.
Create a layer and name it "Hair". Dye your hair any color, even green. Go to the layers palette and set the fill Fill on 0% Thus, what you drew will become invisible.
Roughly speaking, we create a kind of raster area, turn off the fill fill and apply layer styles to the area. The area itself does not become invisible, as is the case with Opasity. The content of the area becomes invisible, but not the area itself. Therefore, the applied layer styles will be visible. But if we set the Opasity to 0%, the entire layer along with the styles would become invisible. We will give the area a certain style, but since we will still have to apply layer blending to paint, the original color must be removed by setting the Fill to 0%, otherwise when blending it will become visible and we will not get the desired result.

Now let's create a style for the layer Layer > Layer Style > Color Overlay In the mixing menu Blend mode set the mode Color. And in the color box, set the color we need.

If you forgot to set the fill to 0%, you can do this in the same window, in the blending settings tab Blending Options. If you did this in the layers palette Layers, then the fill will already be installed as needed.

Now we have full control over color. Give each layer a different style. Double-clicking on the layer will automatically bring up Layer Styles, where you can change the hair color with one click. You don’t have to smudge everything 100 times, the color changes in one second, and you see the result online. Choosing a color has become much easier.

This is what I call color control. Now let's go even deeper.
COLORING PHOTOS THROUGH FILL LAYERS (fill lyers)
You know what I think. These efforts to control the image are certainly cool, but somehow difficult. What if you need to change the color? You have to constantly click on the layer, open the styles window, go to the tab Color Overlay and change something there. Not such a fast process if you want to quickly change the colors of the layers. Of course, if we have 2 layers it’s not difficult, but what if we had 102 layers? We need to make this process even easier. This is where the real work with layers begins. Now I'll show you how to color a photo using fill layers.
Create a new fill layer Layers > New Fill Layers > Solid Color The fill layer completely covers the photo, filling the entire working surface. We just don't need this. As you can see from the Layers palette, the fill layer is created with a ready-made empty mask. We need to turn the white mask into a black mask to hide the entire fill layer. You can click on the mask icon and select Delete.

Or select the mask icon and do the same from the menu Layer > Layer Mask > Delete. Now create a mask from scratch, but not an empty one, but a hiding one. We did this in my article "Masks in Photoshop". Select Layer > Layer Mask > Hide All
Or you can go another way. The mask is the same working surface as the layer itself. The mask can be drawn manually using any drawing tools. For example, with a brush Brush Tool. Only unlike a layer, the mask is created in a gradation from black to white, where white is the visible part, and black is the hiding part. Click on the mask icon in the layer palette. The mask must be selected so that you can draw on it. Then select the fill bucket Paint Bucket Toll and black color. Click on the work surface. An empty mask has become a hiding mask.

Now select a regular brush Brush Tool and white color. Create a hair mask by drawing on top of the mask exactly as you
would draw on a layer. You can enjoy all the benefits of brush settings. Make it transparent, change sizes, soft edges. All this will only affect how visible our mask is. And of course, don't forget to set the layer's blending mode to Color, so that you can immediately see the result of painting. We could have gone a different way. For example, leave the mask white and paint the entire area around the hair black. But you must admit, it is somewhat tedious to cover up 70%
work area. And of course, don’t forget to work on a mask, the mask must be selected. This can be done by simply clicking on its icon in the layers palette.
As a result, you should have a fill layer with a hair mask. The advantage of this method is that you don’t need to delve into color settings every time, which are unclear where. One simple click on the layer fill brings up a window with a color choice.

Paint other areas of the photo in the same way. In some areas where the color doesn't lend itself to soft transitions, you'll need to create highlight areas. For example, in the case of nails, I created selections with the tool Magic Wand Tool And Polygonal Lasso Toll. Otherwise, I made do with changing brush sizes and switching between soft edges and hard edges.

Once you've created all the photo area layers, you can create other tint layers that create hair tones, shimmers, and other lighting effects. This is a professional result. Now let's look at alternative options for coloring the photo.
MAKE A PHOTO COLOR THROUGH ADJUSTMENTS LAYERS
Here's another way to make a photo in color. Let's use the color correction settings adjustments. I can already imagine how you open familiar ones to everyone Image > Adjustments, select an area and apply effects. No, we certainly won’t do that. We will get the same kala malya. Of course, selecting an area, applying color correction, selecting a new area, applying color correction again is an option. Only this option is dull, without any opportunity to tweak and change the results.

Therefore, we will use color correction layers Layer > New Adjustment Layer. A color correction layer is the same color correction, only it is not applied to the graphics layer, but is itself a layer. Imagine that the photo is our layer. And on top we put red glass, which changed the color of the photo. The red glass is the color-correcting layer. You can remove it, make it invisible, apply layers, a mask and more.
Which color corrections are suitable for coloring? In my opinion, color correction is the best option. Photo Filter. Select Layer > New Adjustment Layer > Photo Filter Or create a color adjustment layer through the Layers palette menu Layers.

Now I want you to do everything that I described for coloring photographs through fill layers. Create a mask, fill it with black and use a regular brush to apply the filter to the area you need. This is what you should get:

At the same time, you can reconfigure the filter color, change the color and adjust the mask at any time. Just click on the color correction layer and in the palette Adjustments customize the color. If you don’t know where this palette is located, call it through Windows > Ajustments. You will see for yourself that using color correction to make a photo color is as easy as using fill layers, but I personally prefer the latter.
I hope there is no need to demonstrate step-by-step coloring. You already understand that you need to color all areas of the photo in a similar way. I will give you the final version of the photo colorization and wish you successful experiments in Photoshop. Now you know how to make a photo in color.